Complete Guide to Dried Flower Arranging and Preservation
14 min readContents:
- Why Dried Flowers Are Worth Your Time
- Best Flowers for Drying: A Practical Selection Guide
- High-Success Flowers for Beginners
- Intermediate Flowers Worth the Extra Effort
- Flowers to Approach with Caution
- Dried Flower Preservation Techniques Explained
- Air Drying: The Classic Method
- Silica Gel Drying: For Delicate and Full-Petaled Blooms
- Pressing: Flat Preservation for Paper and Frame Projects
- Glycerin Preservation: For Foliage and Branches
- Freeze Drying: The Professional Standard
- Tools and Supplies You Actually Need
- Essential Tools
- For Arrangements Specifically
- Your First Dried Flower Arranging Guide: Step-by-Step
- Step 1: Choose Your Color Palette
- Step 2: Select a Focal Point Flower
- Step 3: Build in Layers
- Step 4: Vary Stem Heights Deliberately
- Step 5: Secure and Seal
- Caring for Dried Flower Arrangements
- Light and Location
- Humidity and Moisture
- Dust and Cleaning
- Creative Dried Flower Projects Beyond the Vase
- Wreaths
- Framed Pressed Flower Art
- Candle Embellishments
- A Reader Story: The Accidental Collection
- Common Mistakes and How to Avoid Them
- Where to Source Dried Flowers in the US
- Dried Flower Arranging Guide: Frequently Asked Questions
- How long do dried flower arrangements last?
- What is the easiest flower to dry at home?
- Can you use regular foam for dried flower arrangements?
- Do dried flowers attract bugs?
- How do you keep dried flowers from falling apart?
- Start Small, Then Build
Picture this: you’ve just received a gorgeous bouquet — maybe for your birthday, maybe from your garden at peak bloom — and within two weeks, it’s wilting on the counter. You hate throwing it away, but you don’t quite know what else to do. That’s exactly the moment most people discover dried flower arranging, and honestly, it changes everything about how you think about flowers.
Dried flowers have been used decoratively for centuries, but they’ve surged back into popularity in a serious way. Google searches for dried flower décor have grown by over 200% since 2020, and florists across the US report that dried arrangements now make up anywhere from 20–40% of their sales. It’s not a trend — it’s a shift. People want beauty that lasts longer than a week and doesn’t require a subscription to keep fresh.
This dried flower arranging guide covers everything: which flowers dry best, how to preserve them properly, which techniques suit which blooms, and how to actually style them into something you’d be proud to hang on your wall or place on your table. Whether you’re a total beginner or someone who’s tried air-drying with mixed results, there’s something here for you.
Why Dried Flowers Are Worth Your Time
Fresh flowers are fleeting. A peony lasts maybe five days in a vase. A dried peony? Properly preserved, it can hold its shape and color for two to three years. That’s not just convenient — it’s a completely different relationship with flowers.
Dried arrangements also cost significantly less to maintain over time. A quality dried bouquet from an artisan florist typically runs $45–$120 in the US market, but making your own from garden-grown or farmer’s market blooms can bring that cost down to under $15. And unlike fresh arrangements, there’s no weekly water change, no wilting to manage, and no rushing to use them before they turn.
There’s also a creative freedom that fresh flowers don’t offer. Dried blooms can be dyed, bleached, painted with gold leaf, or left in their natural state with that gorgeous muted palette — dusty pinks, warm taupes, pale lavenders, soft creams. They work in rustic farmhouse spaces and sleek modern interiors equally well.
Best Flowers for Drying: A Practical Selection Guide
Not every flower dries gracefully. Some shrivel into unrecognizable brown scraps. Others emerge from the drying process looking more beautiful than they did fresh. Knowing which is which saves a lot of frustration.
High-Success Flowers for Beginners
These flowers are forgiving, widely available, and reliably beautiful when dried:
- Strawflowers (Helichrysum bracteatum): Often called the everlasting flower, strawflowers are practically made for drying. Their papery petals hold color and structure with almost no effort. Available in red, orange, yellow, pink, and white.
- Lavender: Harvest just before the buds fully open for the most fragrance retention. Bundles of lavender air-dry perfectly and smell incredible for months.
- Statice (Limonium sinuatum): Another natural dryer. The tiny clustered blooms in purple, white, and pink hold their color beautifully and add airy texture to arrangements.
- Globe amaranth: These round, clover-like heads retain their magenta, pink, and white tones remarkably well. They dry in about 2–3 weeks hanging upside down.
- Baby’s breath (Gypsophila): A classic for a reason. Air-dry in small bundles and expect light, cloud-like texture that fills arrangements perfectly.
- Celosia (cockscomb): The velvety, brain-like plumes of celosia dry into rich burgundy, coral, and gold tones that add serious visual weight to any arrangement.
Intermediate Flowers Worth the Extra Effort
- Roses: Dry best using silica gel (see below). Air-dried roses tend to droop and lose petals. But silica-dried roses at peak bloom are stunning — and hold color far better than air drying.
- Peonies: Harvest when the bud is just starting to open, not fully bloomed. Air-dry quickly to minimize petal drop. Expect some color fading, but the shape is worth it.
- Hydrangeas: Let them dry partially on the plant before cutting — when the petals feel slightly papery to the touch, cut and air-dry upright in a vase with a little water (the “water drying” method). This prevents drooping.
- Pampas grass: Harvest before the plumes fully open to prevent excessive shedding. Air-dry standing upright in a tall container.
Flowers to Approach with Caution
Tulips, dahlias, and daffodils have high moisture content and thin, delicate petals — they’re difficult to dry without browning or collapsing. If you’re determined, silica gel is your only real option, and even then, results are inconsistent.
Dried Flower Preservation Techniques Explained
The method you choose depends on the flower type, your timeline, and the finish you’re after. Each technique produces a different result.
Air Drying: The Classic Method
Air drying is the most accessible method and works beautifully for low-moisture, sturdy blooms. The process is straightforward: remove lower leaves, bundle 5–10 stems together with a rubber band (rubber expands as stems shrink, keeping the bundle tight), and hang upside down in a warm, dry, dark space with good airflow.
Darkness is critical here — UV exposure is the main cause of color fading in dried flowers. A closet, attic, or shaded room works well. Most flowers air-dry completely in 2–4 weeks, depending on humidity. In humid climates (the Southeast, Pacific Northwest), this can stretch to 6 weeks or result in mold. If you’re in a humid region, consider a dehumidifier in the drying space or use silica gel instead.
Silica Gel Drying: For Delicate and Full-Petaled Blooms
Silica gel is a granular desiccant that draws moisture out of flowers in 3–7 days. It produces far better results with delicate blooms, preserving petal shape and color much more faithfully than air drying.
To use it: pour a 1-inch layer of silica gel into an airtight container, place your flower face-up (for single blooms) or face-down (for flat-faced flowers like daisies), then carefully spoon more silica gel over and around the petals until fully covered. Seal the container and check after 3 days. Flowers are done when petals feel crisp and paper-like but not brittle.
A 2.5 lb container of silica gel costs around $12–$18 at craft stores and is fully reusable — just spread it on a baking sheet at 250°F for 30 minutes to reactivate it. One container can dry hundreds of flowers over its lifetime.
Pressing: Flat Preservation for Paper and Frame Projects
Pressed flowers are dried flat under pressure, producing two-dimensional specimens ideal for framed art, greeting cards, resin jewelry, and candle decoration. Place flowers between two sheets of parchment paper inside a heavy book, then stack more books on top. Check after 2 weeks; most flowers press fully in 3–4 weeks.
A flower press (available for $10–$30) speeds up the process and produces more consistent results than books. For the flattest, most detailed pressings, harvest flowers at midday when moisture content is lowest.
Glycerin Preservation: For Foliage and Branches
Glycerin preservation replaces the water in plant cells with glycerin, leaving foliage soft, pliable, and naturally colored — not stiff and brittle like air-dried material. It works best on leaves, branches, eucalyptus, and magnolia.
Mix one part glycerin with two parts boiling water, let cool slightly, then stand fresh-cut stems in the solution. The plant draws glycerin up through the stem over 2–6 weeks. Leaves turn from green to a rich bronze or dark green, and they’ll stay flexible for years. This technique doesn’t work well on flowers — petals don’t absorb glycerin effectively — but it’s transformative for foliage elements in arrangements.
Freeze Drying: The Professional Standard
Freeze drying produces the most lifelike results of any preservation method — flowers retain their original color, shape, and even fragrance with remarkable accuracy. The process involves freezing the flower and then using a vacuum chamber to remove moisture through sublimation.
The catch: freeze-drying equipment costs $2,000–$10,000+, making it impractical for home use. Many professional florists send bridal bouquets to specialized freeze-drying services, which typically charge $150–$400 per arrangement and take 6–8 weeks. If you have a sentimental bouquet worth preserving perfectly, it’s worth investigating.
Tools and Supplies You Actually Need
You don’t need a studio full of equipment to start. A focused starter kit will handle most projects.
Essential Tools
- Floral snips or sharp scissors: Clean cuts prevent stem crushing. A basic pair of Fiskars floral snips runs about $12 and will last years.
- Rubber bands: Not twist ties. Rubber bands contract as stems dry and shrink, keeping bundles tight without slipping.
- Floral wire (22-gauge and 26-gauge): Many dried stems become brittle and snap. Wiring gives you flexibility for wiring stems onto picks, extending length, or supporting heavy heads like dried roses.
- Floral tape: Self-sealing green or brown tape that wraps wire and stems for a clean finish. Available in most craft stores for $3–$5 per roll.
- Hot glue gun: Indispensable for securing dried stems that are too fragile to wire. Use low-temp settings to avoid scorching petals.
- Wire cutters: Essential once you start working with floral wire regularly.
For Arrangements Specifically
- Floral foam (dried/desert foam): Different from fresh foam — dried flower foam is firmer and doesn’t require water. It holds stems securely without crumbling. About $8–$15 per block.
- Vases, vessels, and containers: Dried flowers work in everything from ceramic pots to wicker baskets to clear glass vases. The vessel choice shapes the entire aesthetic.
- Hairspray or acrylic sealer: A light coat of unscented hairspray or floral sealer extends the life of dried arrangements by reducing moisture absorption and slowing color fade. Spray from 12 inches away.
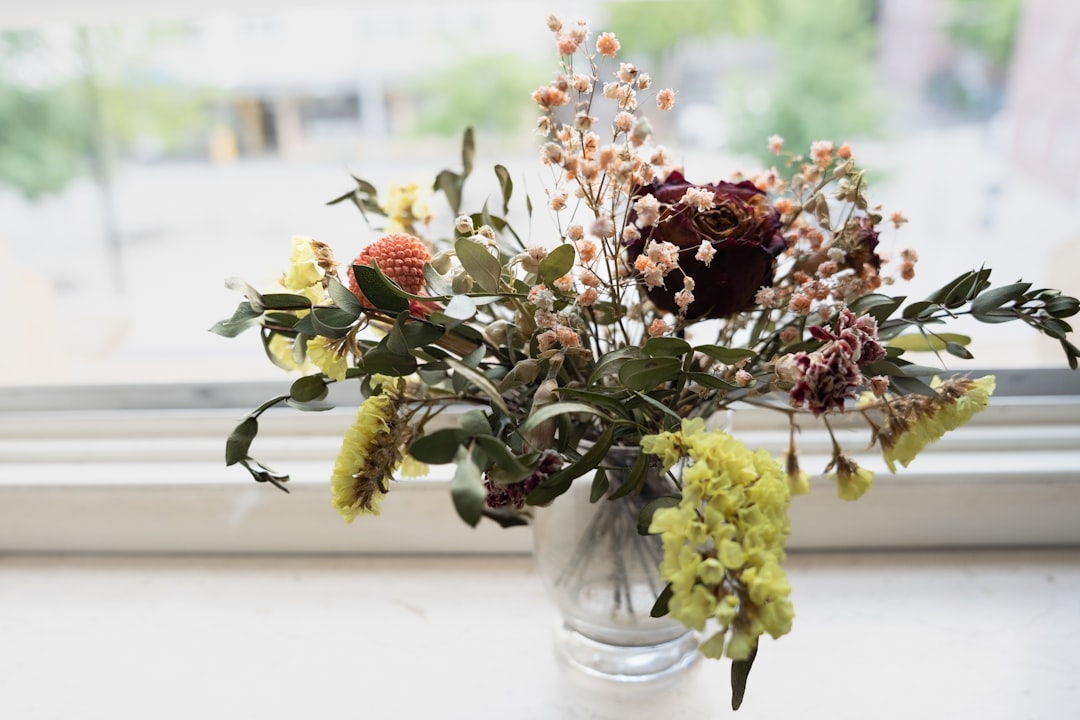
Your First Dried Flower Arranging Guide: Step-by-Step
Here’s a practical walkthrough for creating a wall-hanging dried arrangement — one of the most popular formats right now, and genuinely beginner-friendly.
Step 1: Choose Your Color Palette
Before you touch a single stem, decide on two or three colors maximum. Dried flowers are strongest when the palette is intentional. A warm palette might use: strawflowers in burnt orange and cream, celosia in deep burgundy, pampas grass in natural ivory, and eucalyptus in dusty sage. A cool palette: lavender, statice in purple and white, baby’s breath, and preserved silver dollar eucalyptus.
Step 2: Select a Focal Point Flower
Every strong arrangement has a visual anchor — typically the largest or most striking flower. For dried arrangements, dried roses, peonies, protea, or large celosia heads work beautifully as focal points. You’ll build everything else around and behind this bloom.
Step 3: Build in Layers
Start with your foliage and filler — eucalyptus, ferns, pampas grass. These create the overall shape and size of the arrangement. Then add mid-size flowers to fill the middle layer. Finally, place your focal blooms last, positioning them at slightly varying heights for a natural, non-symmetrical look.
The rule of odd numbers applies here just as it does in fresh floristry: groupings of 3, 5, or 7 of the same flower look more natural than even pairs.
Step 4: Vary Stem Heights Deliberately
A flat-topped dried arrangement looks rigid and artificial. Stagger heights so that focal flowers sit roughly 1.5x the height of the container, mid-level blooms sit at 1x, and trailing or filler elements cascade slightly below the rim.
Step 5: Secure and Seal
Once you’re happy with the arrangement, secure any loose stems with floral wire or a small dot of hot glue. Finish with a light spray of acrylic sealer from about 12 inches — two passes, letting it dry between coats. This step is often skipped, but it makes a measurable difference in longevity.
Caring for Dried Flower Arrangements
Dried flowers are low-maintenance, but “low” isn’t zero. A few habits will significantly extend their life.
Light and Location
Direct sunlight is the number one enemy of dried flower color. Keep arrangements away from south- or west-facing windows that get prolonged afternoon sun. A spot that receives bright indirect light is ideal. In a sunny room, expect noticeable fading within 3–4 months; in a shaded interior, arrangements often hold their color for 18–24 months.
Humidity and Moisture
Kitchens and bathrooms are poor locations for dried arrangements due to steam and humidity fluctuations. Humidity causes dried flowers to reabsorb moisture, which leads to drooping, mold, and eventual disintegration. Aim for rooms with relative humidity below 60%.
Dust and Cleaning
Dust settles on dried arrangements visibly over time. Use a can of compressed air (the kind sold for keyboards) to blow dust off gently. Never use a damp cloth — the moisture will damage the blooms. A soft makeup brush works well for individual flowers that need more precise cleaning.
Creative Dried Flower Projects Beyond the Vase
Once you have a collection of dried stems, the possibilities expand considerably.
Wreaths
A grapevine or wire wreath base provides a sturdy foundation. Hot-glue dried blooms in clusters, working around the base in one direction for a cohesive look. A 12-inch wreath typically uses 15–25 stems depending on bloom size. Dried lavender, strawflowers, and eucalyptus are wreath staples.
Framed Pressed Flower Art
Pressed flowers arranged under glass in a float frame create botanical art that looks genuinely expensive. Use acid-free mat board and UV-filtering glass to slow fading. A shadow box frame with 1–2 inches of depth allows for thicker specimens like dried rose heads to be displayed without crushing.
Candle Embellishments
Pressed flowers can be adhered to pillar candles using a heat tool or brief contact with a warm candle. The result looks like flowers embedded in wax. Use only pressed specimens (not three-dimensional dried flowers) for this, and never leave candles unattended — the flowers are combustible.
A Reader Story: The Accidental Collection
A reader named Mara from Portland, Oregon wrote in about how she started drying flowers entirely by accident. She’d forgotten a small bunch of sweet Williams in a sunny window for three weeks, and when she finally noticed them, they’d dried into something unexpectedly beautiful — slightly faded, perfectly stiff, still holding their ruffled shape. She started intentionally collecting and drying blooms from her garden that summer, and by fall had enough material to make gifts for every person on her holiday list. “I spent maybe $20 total on supplies,” she said, “and gave away twelve arrangements.” That’s the thing about dried flower arranging — it tends to become a habit quickly.
Common Mistakes and How to Avoid Them
- Drying at full bloom: Flowers harvested fully open drop petals aggressively and look past their prime when dry. Harvest at 75% open.
- Bundles that are too large: Bundles over 10 stems trap humidity at the center, leading to mold. Keep bundles small and ensure airflow around all sides.
- Skipping the rubber band: Twist ties and string don’t contract with the stems. Use rubber bands to maintain bundle tightness throughout the drying process.
- High-humidity drying spaces: A laundry room, bathroom, or basement will dramatically slow drying time and increase mold risk. Choose warm, dry spaces with good ventilation.
- Forcing stems into dry floral foam: Dried stems snap easily under pressure. Pre-make a hole with a toothpick or skewer before inserting delicate stems into foam.
- Overcrowding arrangements: Dried flowers need visual breathing room. An overcrowded arrangement reads as chaotic rather than lush. Leave space between stems intentionally.
Where to Source Dried Flowers in the US
Growing your own is the most economical route if you have outdoor space — a 4×4-foot cutting garden of strawflowers, statice, celosia, and lavender can supply a season’s worth of material for well under $30 in seeds. But for those without garden space, several excellent options exist.
Farmer’s markets in most US cities carry dried bundles seasonally, typically priced $8–$18 per bundle. Online retailers like Terrain, afloral.com, and Etsy shops specializing in dried botanicals offer a wider variety year-round, with bulk bundles running $15–$35. Wholesale options through platforms like FiftyFlowers.com cater to those making larger quantities for events. Many Trader Joe’s and Whole Foods locations now carry basic dried bundles — lavender, pampas, and eucalyptus — for $6–$14.
Dried Flower Arranging Guide: Frequently Asked Questions
How long do dried flower arrangements last?
Most properly dried and sealed arrangements last 1–3 years with basic care. Arrangements kept out of direct sunlight and away from humidity can hold their color and structure for up to 3 years. Exposure to UV light is the primary cause of fading and typically shows visible results within 3–6 months in a sunny location.
What is the easiest flower to dry at home?
Strawflowers (Helichrysum) are the easiest flower to dry at home. Their papery petals contain very little moisture, so they air-dry reliably in 2–3 weeks with almost no color loss. Statice and globe amaranth are close runners-up and equally beginner-friendly.
Can you use regular foam for dried flower arrangements?
No — regular fresh floral foam is designed to hold water and will crumble and disintegrate when dry. Use foam specifically labeled for dried or artificial flowers, which is denser, firmer, and moisture-free. It’s sometimes labeled “desert foam” or “dry foam” at craft stores.
Do dried flowers attract bugs?
Dried flowers can occasionally attract small insects, particularly if they were not fully dried before arranging. Spider mites and silverfish are the most common culprits. To prevent this, ensure flowers are completely dry before use and occasionally inspect arrangements. A light spray of insecticidal soap on the drying bundles (before arranging) can help deter pests.
How do you keep dried flowers from falling apart?
The most effective strategies are: harvest at 75% bloom (not full), dry in low humidity, handle gently after drying, use floral wire to support fragile stems, and apply a light coat of acrylic sealer or unscented hairspray once arranged. Avoid moving arrangements frequently — repeated handling is the fastest way to lose petals.
Start Small, Then Build
You don’t need to tackle a full wall installation on your first attempt. Start with a single bundle of lavender or a handful of strawflowers from a farmer’s market, hang them upside down in a closet for three weeks, and see what you get. Most people are genuinely surprised by how beautiful and easy the results are — and that surprise is usually what hooks them.
From there, you can experiment with silica gel for roses, try your first wreath, or press flowers for a framed piece. The skills compound quickly, and the materials are inexpensive enough that experimentation carries little risk.
This dried flower arranging guide has given you the foundation — the techniques, the tools, the sourcing, the troubleshooting. Now the best next step is a practical one: pick one flower, choose one method, and start drying. Your first arrangement is waiting.